Project Axial AX10 - Trail Basher
   INTRODUCTION   
BYT Project AxialAxial Racing set the RC Crawling world on fire with the release of their AX-10.  Keeping true to the spirit of the typical RC Crawling fanatic, the kits were quickly modified from their stock form into better and more agile crawling units.  The AX-10 kit also provided custom crawler builders with additional axle and transmission options for their personal creations.  Axial was in tune enough to the scene to start offering a variety of hop-ups such as narrowed rims, high-clearance links, rear steering, different spring rates and more. 

As a certifiable crawler newbie, I’ve been watching lots of BYT forum members construct great performing stock rigs, and quite a few custom rigs based upon the AX platform.  My goal for the AX project was to start with an out-of-the-box Axial kit and add a few select, easy to install hop-ups to create not just a solid performing crawler but also a good general purpose trail truck.  This is not a competition crawler build.  I really wanted to show how easy it is for anyone to build their very own custom truck and make it do what you want it to do!  The key to any build is to make it your own.

The plan:

  • Start with an Axial AX-10 crawler kit
  • Upgrade to a custom tube chassis from RummyRC
  • Add electronics from Holmes Hobbies (Cobalt 7t motor, Castle Sidewinder ESC, Castle BEC)
  • Add lithium power from Apogee
  • Utilize some carbon fiber from FullForceRC
  • Upgrade the wheels and tires / add weights to the rims (HobbyFever to the rescue)
  • Add a Jeep Rubicon body ('cause it looks cool)
  • Ultimately end up with a general purpose, semi-scale looking, crawler, trail basher and stump jumper.


   THE PLATFORM   

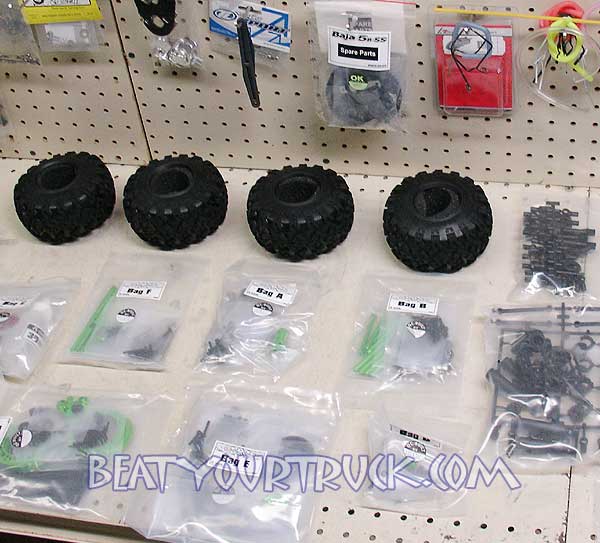
I ordered our shiny new Axial AX10 kit from Holmes Hobbies.  The guys at HH are all about RC crawling and their prices and service are tough to beat.  The package arrived quickly and the build began in short order! 

The Axial kit is simply stellar.  The fit and finish is excellent and the instructions are as good as or better than any in the RC kit world today.  Due to the awesome instructions Axial includes with the AX kit, we will not go into detail on the stock truck build.  Just know that you are in for a treat when it comes to building the truck.  A big “thumbs-up” to Axial for doing such a great job with this truck and know that if you simply want to build a solid crawler without all the customization we are doing, the AX10 kit is the way to go. 
Beat Your Truck Axial AX10 build


   CHASSIS   
Once we had the stock Axial AX10 truck assembled (minus body and tires/wheels), I grabbed a mop, sopped up our drool puddle and boxed the rig up for shipment to RummyRC so they could gather dimensions and start working on the tube chassis. 
Beat Your Truck Axial AX10 build
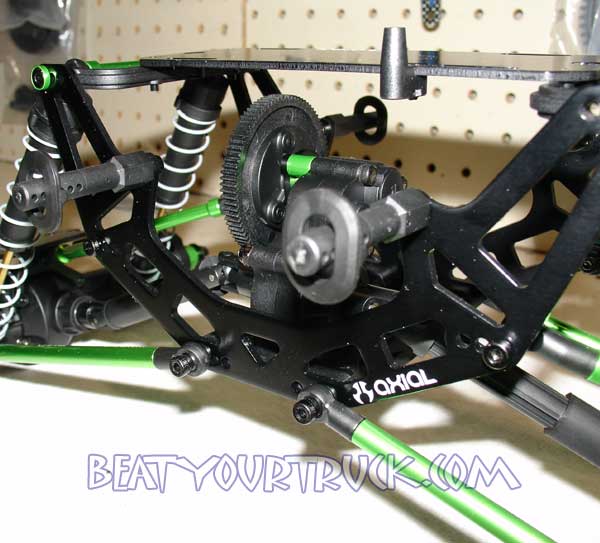
Nick at RummyRC asked a few questions like what our intentions were with the truck (competition crawler or a nice crawler with trail busting abilities), battery type and location (axle or inside the truck body), what body I would be using, what electronics I planned on using, etc.  This gave him the info he needed to start constructing a chassis to meet (and hopefully exceed) my needs.  The build from scratch process would take a few weeks so while they were fabricating our chassis, I moved onto other goodies for the project.


   WHEELS / TIRES   

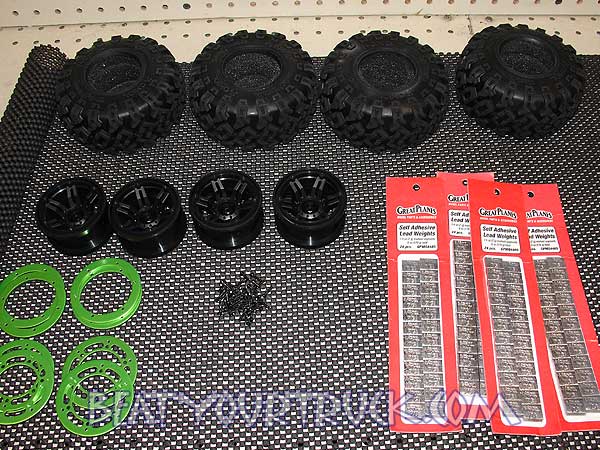
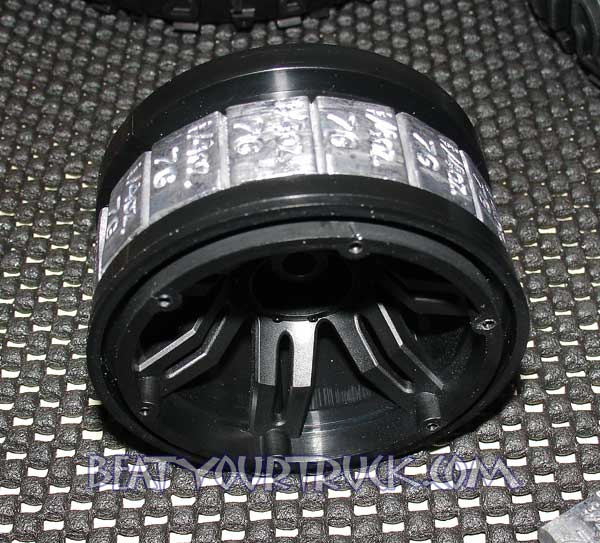
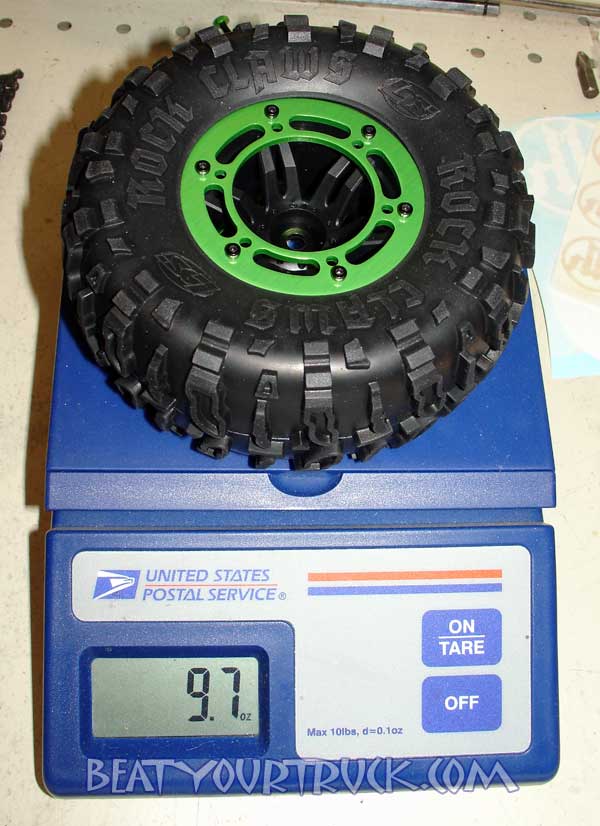
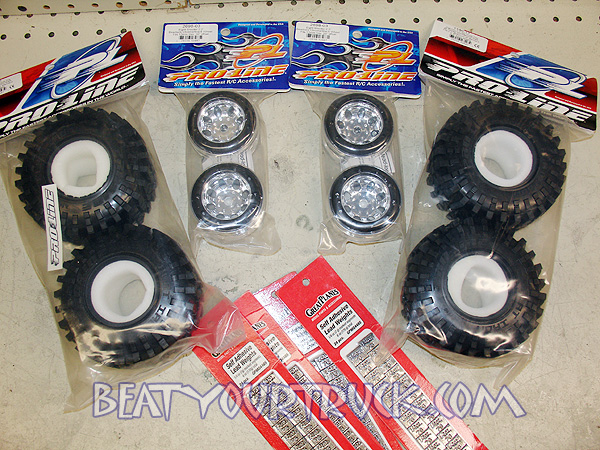
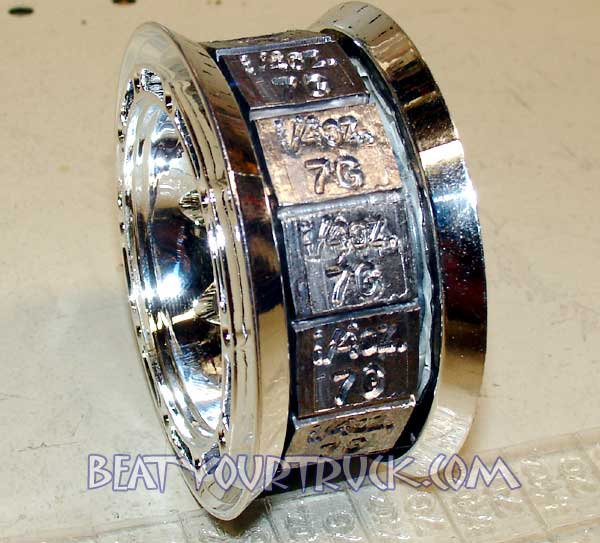
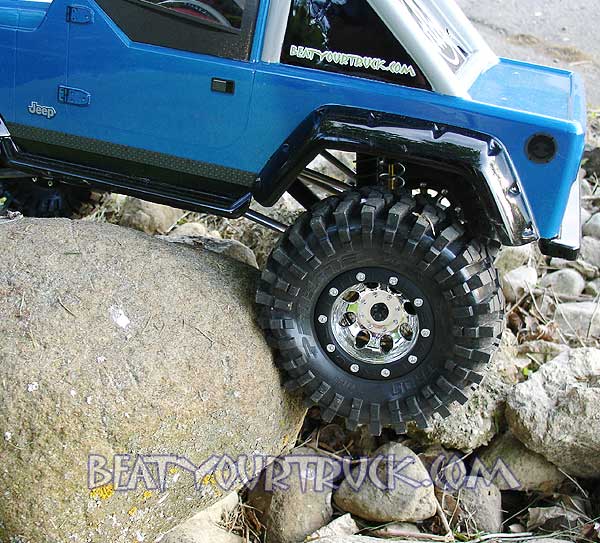
The next stop was Hobby Fever for a set of 2.2 Losi Rock Claw tires for use with the stock Axial wheels and a set of new Pro-Line Eight-Shooter wheels and Pro-Line Flat Iron tires (and a pile of self-adhesive wheel weights).  The order arrived in two days and I started building the wheel/tire assemblies. 

Axial Wheels and Losi Rock Clawz Tires
I used the stock Losi tire foam but cut an 8-point star pattern (about ½” deep) around the foam.  I also removed about 2-3mm of foam from the outside circumference of the foam.  It doing this seemed to let the tire relax a little and conform better.  I’ll see if it works once I hit the rocks!   The self-adhesive weights were applied to the inside of the rim, between the wheel and foam, and we opted for 5 ounces in each front wheel and 4 ounces in each rear wheel.   Reference the chart below for some weight data we gathered during our tire build.

Beat Your Truck Axial AX10 build

Beat Your Truck Axial AX10 build

Beat Your Truck Axial AX10 build

Pro-Line Eight-Shooter Wheels and Pro-Line Flat Iron Tires
The Pro-Line tires come with memory foam so rather than mod it right away, we wanted to see what it could do. The self-adhesive weights were applied to the rim and we opted for 5 ounces in each front wheel and 4 ounces in each rear wheel.   The Pro-Line rims are sweet as they have an inner, recessed groove where you can apply the lead weights!
Beat Your Truck Axial AX10 build

Beat Your Truck Axial AX10 build

Weight
Description
1.8 oz.
(1) Stock Axial Wheel (wheel only, no rings, etc)
5.2 oz.
(1) One Stock Axial wheel, foam, rock rings, hardware and Losi Rock Clawz
5.9 oz.
(1) One Stock Axial wheel, foam, rock rings, hardware and Axial Rock Lizard Tire
8.7 oz.
(1) One Stock Axial wheel, foam cut, with Losi Rock Clawz & 4oz. lead weight
9.7 oz.
(1) One Stock Axial wheel, foam cut, with Losi Rock Clawz & 5oz. lead weight
   
0.6 oz.
(1) Pro-Line Eight-Shooter Wheel (wheel only, no beadlock rings, no foam etc)
2.4 oz.
(1) Pro-Line Eight-Shooter Wheel (wheel , beadlock rings, hardware) no foam
1.5 oz.
(2) Pro-Line beadlock rings only (these rings are heavy!)
6.9 oz.
(1) Pro-Line Eight-Shooter Wheel (wheel, beadlock rings, hardware, foam) and Pro-Line Flat Iron tire
10.7 oz.
(1) Pro-Line Eight-Shooter Wheel (wheel, beadlock rings, hardware, foam) and Pro-Line Flat Iron tire & 4 oz. lead weight
11.7 oz.
(1) Pro-Line Eight-Shooter Wheel (wheel, beadlock rings, hardware, foam) and Pro-Line Flat Iron tire & 5 oz. lead weight

A wide range of suggestions were given on weight amounts when we were chatting with our crawling experts on the BYT forum.  I expect that I will be playing with some different weight setups as time goes on but felt this was a good place to start.


   CHASSIS is DONE !   

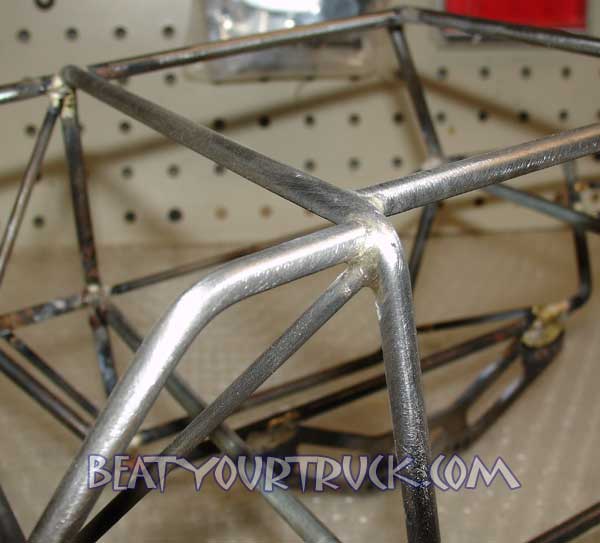
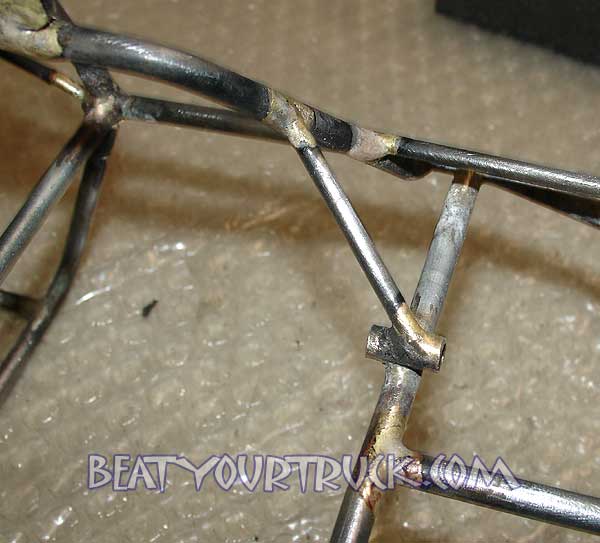
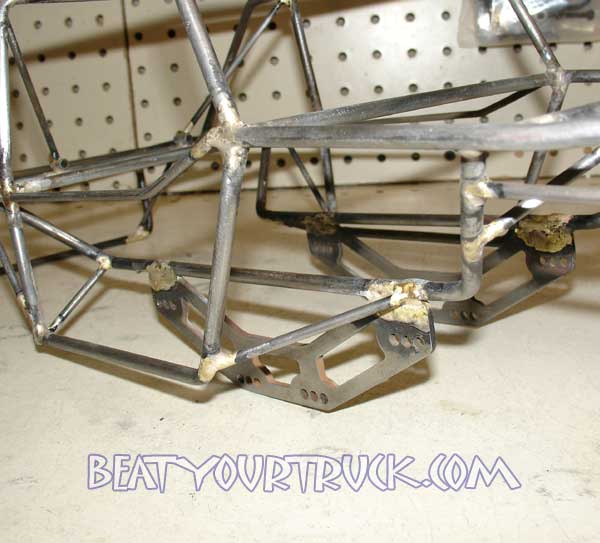
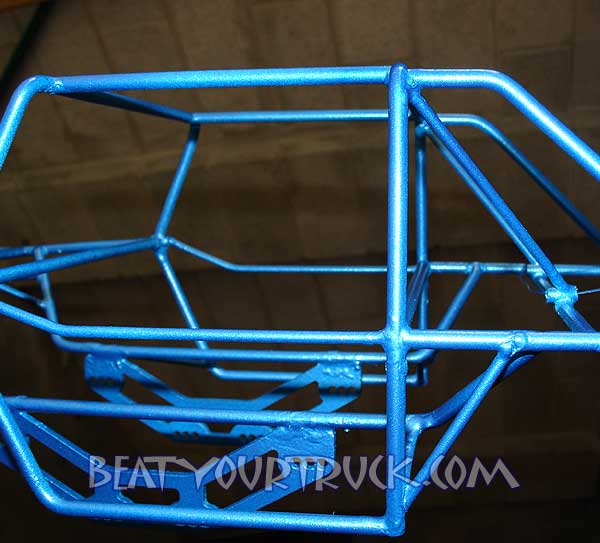
Getting our finished chassis in the mail from RummyRC was like having Santa show up at our door.  I requested to receive the chassis in raw form so I could check out the joint work first hand.  As you can see by the pictures, the construction is top notch with bracing in all the right places and all the joints look very, very solid.  The chassis is extremely well made. 
Beat Your Truck Axial AX10 build
I really liked the way RummyRC worked in the lower skid/trans mounting plate from the Axial kit.  That lower skid is sandwiched in between two laser cut plates of steel, giving the chassis an extra level of strength and durability. Several link mounting holes are provided and will give me some things to play with to try to tweak the handling. The upper shock mounts are sweet and delivered a very vertical mount angle, great for the general trail busting unit I am trying to build…..yes, this truck will be getting some air! It should be noted that the stock Axial trans plate allows for a lot of flex when the motor and transmission are all mounted up. The chassis does not flex, the Axial transmission/motor/skid plate flexes. While this is not a huge deal for now, we'll be searching for an aluminum replacement in the future.
Beat Your Truck Axial AX10 build
An important thing to note is that the chassis is designed to use all of the stock Axial links, axles, shocks, etc. Originally, I had planned for RummyRC to add a front stinger to the chassis but as the project progressed, I was really liking the idea of keeping the body uncut and intact. The stinger would have required some body chopping and I wanted this truck to look more like a weekend trail warriors machine, feeding back into my general purpose theme. Basically a truck that would be driven to work during the week and hit the trails and rock piles on the weekend. In the 1:1 world, it is a compromise that many 1:1 off-roaders must make!

The chassis was scuffed down using a Scotch-Brite pad and removed all the oxidation and residue from the braising process.  After it was all scuffed down, it was wiped it down with denatured alcohol and hit it with two coats of primer.  Wow!  It looks totally different when it is in a single color!  Now it is REALLY starting to look like a chassis. 
Beat Your Truck Axial AX10 build
Once the primer had completely dried, three coats of blue metal flake were appiled.  It looks absolutely beautiful.  Too bad it's going to beat up!
Beat Your Truck Axial AX10 build


   PUTTING IT TOGETHER   

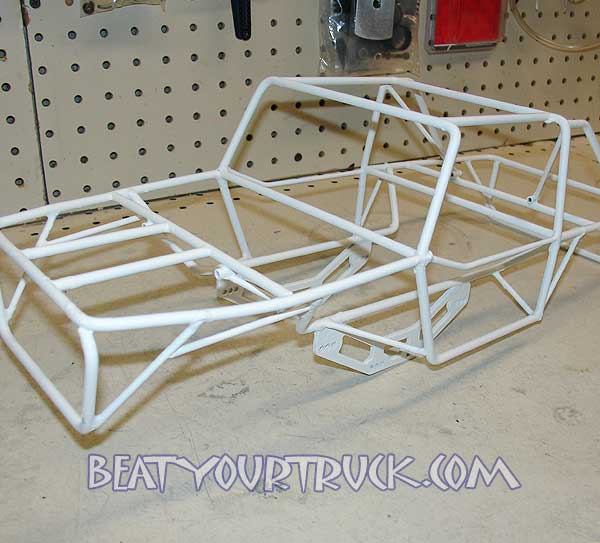
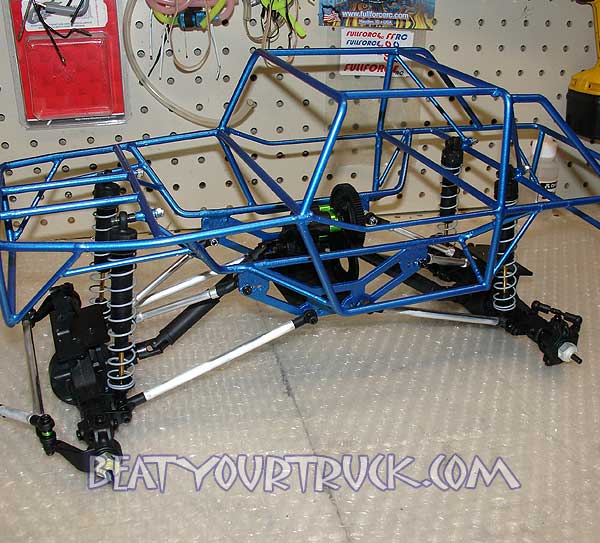
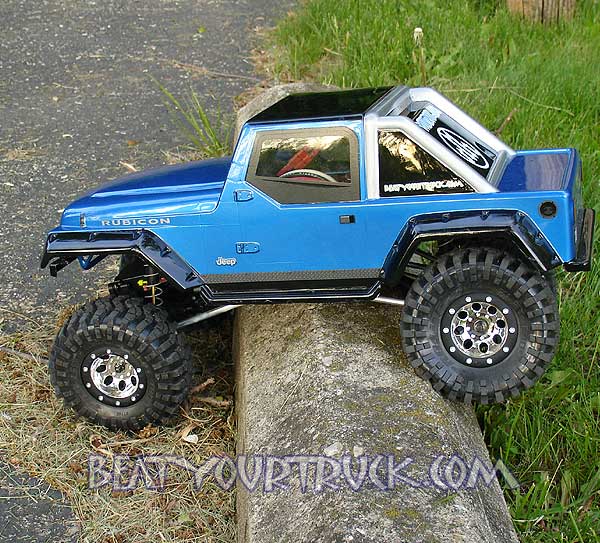
Once our chassis was painted, we simply used the stock Axial links, transmission, skid plates, axles etc to build the truck. Rummy RC had designed the chassis to work perfectly with the Axial guts. This is a piece of cake! We did strip the green anodizing off of the links and just went with straight natural aluminum. We thought it looked better and we were right, especially with the ProLine chrome wheels!
Beat Your Truck Axial AX10 build

   ELECTRONICS   
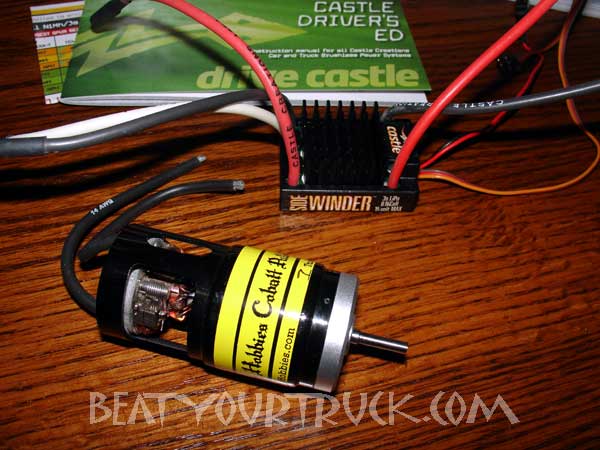
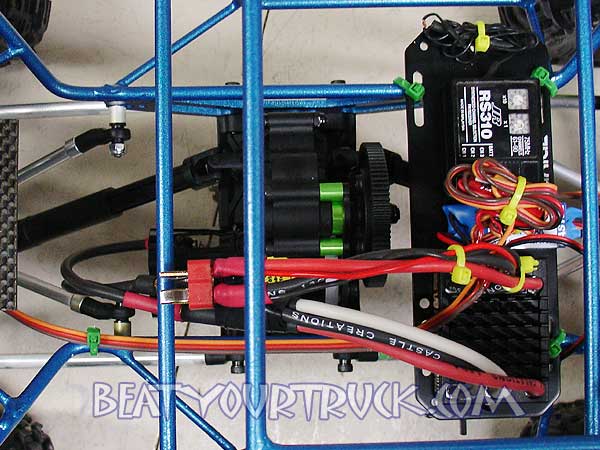
Next, back to Holmes Hobbies for the electronics.  I talked to John at HH and he mentioned a particular setup he runs in a number of his personal trucks.  Sounds good 
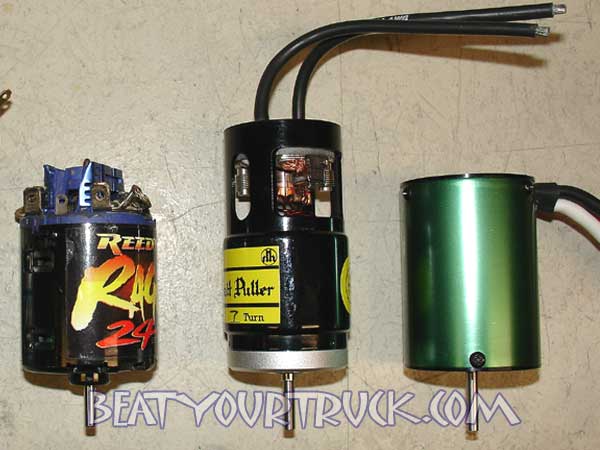
to me!  He pointed me to the Cobalt Puller 7T brushed motor and a Castle Sidewinder ESC.  Powered by a Apogee 3S 11.1 volt lithium battery, I can expect a mix of some serious pulling power and some decent wheel spinning, turf digging trail speeds.  The fully programmability of the SideWinder ESC will allow me to create a few different, easy to load configurations, one setup for trail bashing, one for crawling and one for a mix of the two terrains.

Beat Your Truck Axial AX10 build

Note the picture below comparing the HH 7turn to a standard 540 motor and a Mamba Max
brushless motor. It is a big unit but fits very nicely in the Axial setup.

Beat Your Truck Axial AX10 build

I used our Dremel to put a small flat spot on the motor shaft. With the amount of torque this motor will be putting out, there is simply no way the pinion will stay in place without it. The stock 14t pinion will be used to start with and if need be, different ones will be tried to find a nice mix of crawling and trail busting speed.

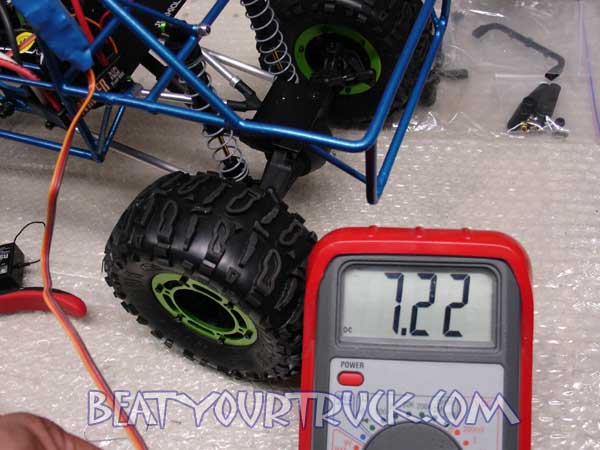
When it came time for power, the choice was lithium and Apogee is BYT's preferred source.  This truck would require some serious run time and power.  PFM Distribution had exactly what I wanted in a 2200mah 11.1 volts package and it was on my doorstep 2 days after ordering it!  The plugs for this project will be Deans Ultra-Plugs (on the battery connections) and Castle 4mm Bullet Connectors (on the motor connections).  I snagged the Deans plugs up at Hobby Fever and the Castle bullets at Holmes Hobbies.
Beat Your Truck Axial AX10 build
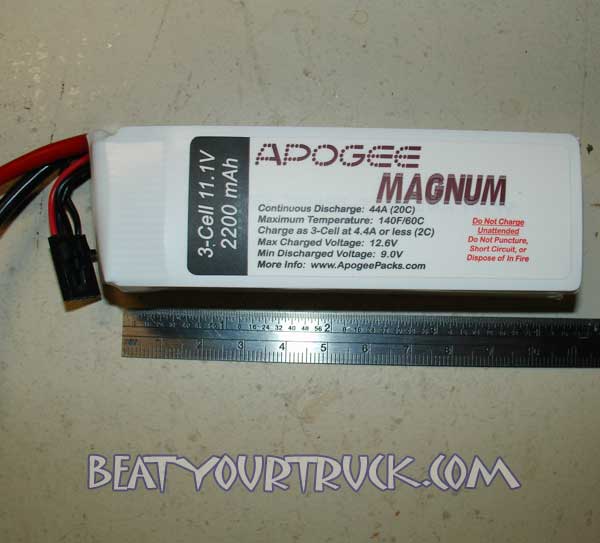
The original plan was to just strap our battery to the chassis however with the tough environment this truck was going to perform in, I had some concerns about the lithium battery getting beat against the tube chassis. So I grabbed a 2mm sheet of FullForce RC carbon fiber and cut out a battery plate for the front of the truck. If you do any custom stuff at all, or are thinking about it in the near future, pick up some carbon fiber sheets from FullForce RC. I am constantly amazed how often I am using this stuff!

The carbon fiber is lightweight and it gave my battery a nice smooth mounting surface. As our general purpose trail basher will have a higher center of gravity than a purpose built crawler, putting this weight up front will help keep the front end down when climbing challenges present themselves.  Mounting the battery under the plate will further lower the center of gravity.  We drilled a few holes in the plate and zip tied it to the chassis rails. Attaching the battery was simple with some Velcro straps we picked up at our local Menards (most hardware stores will carry these in various colors).  Three straps were used ultimately to keep the battery securely mounted.
Beat Your Truck Axial AX10 build
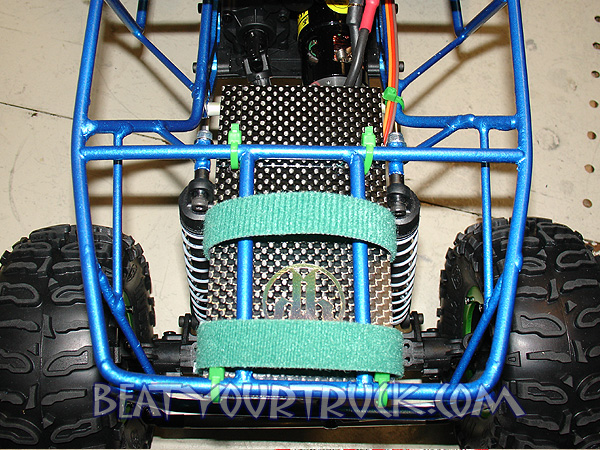
Next on the electronics list was a Castle BEC (again from Holmes Hobbies).  This is going to be a key component in delivering exactly 7.2 volts to our servo (a Tower Pro MG995 I picked up from a friend of mine …..thanks Cossack!).  The Castle BEC output can be easily adjusted via the Castle Link software.  The BEC power wires will be directly connected to the ESC battery plug so it will get the full 11.1 volts and we can adjust the output to the servo from there.  Reference our wiring diagram for how we accomplished this….it is quite easy and works extremely well.  Keep in kind that you should unplug the battery when storing this setup as the BEC could drain the battery if left for long periods of time.

Beat Your Truck Axial AX10 build
Beat Your Truck Axial AX10 buildTo mount the electronics, I used the stock Axial plate, attached to the frame with a couple of zip ties for easy
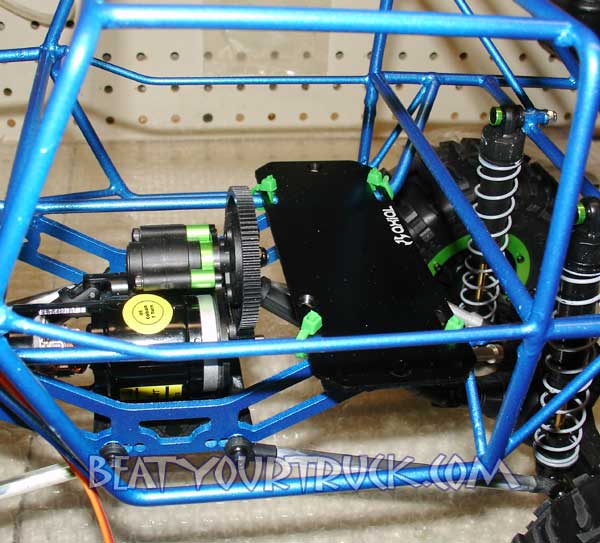
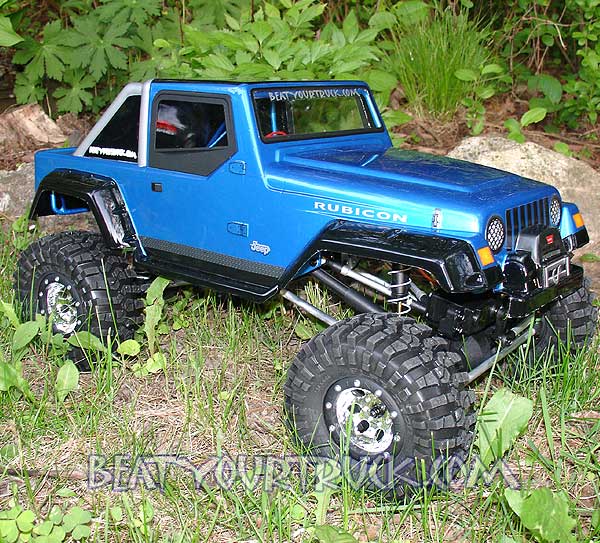
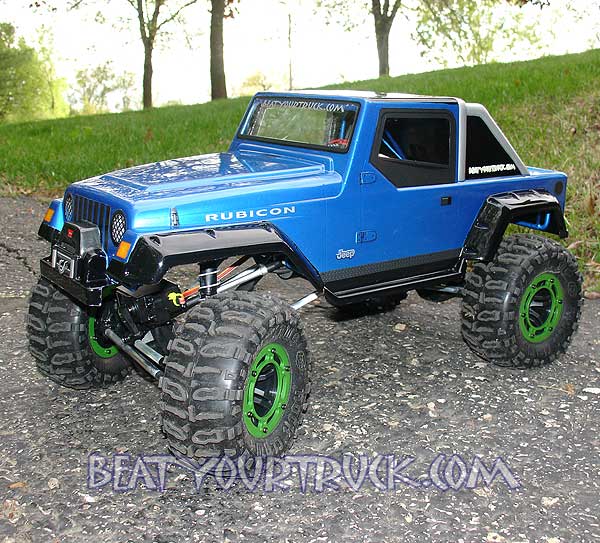
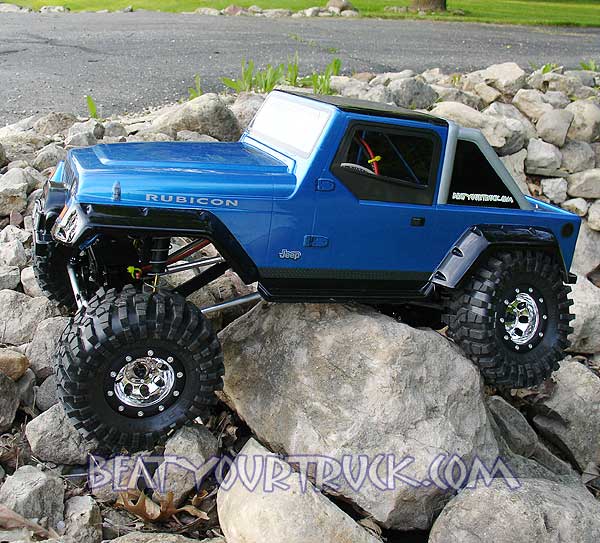
removal when we have to hose down the truck.
Beat Your Truck Axial AX10 build


   A SHELL TO COVER IT ALL   

There are a bunch of body options to choose from but ultimately, I chose one of the most popular, the Jeep Rubicon.   This decision had to be made before the chassis was even started as RummyRC built the chassis around this body.  The paint job is simple, metallic blue, metallic black and Indy silver. 

Once it was all painted and trimmed up, we plopped it onto the chassis and it fit like a glove.  The thought of drilling holes for mounting the body gave me chills and it would go against any type of semi-scale look we were after.  So, once again it is time for some Velcro!  Nick at RummyRC made the suggestion and a good one it was (he has lots of good ideas being the crawler guru he is).  For about $3, I picked up some self adhesive Velcro squares and added a few here and there on the chassis and body.  It works great! 
Beat Your Truck Axial AX10 build


   TIME FOR A BEAT RUN   

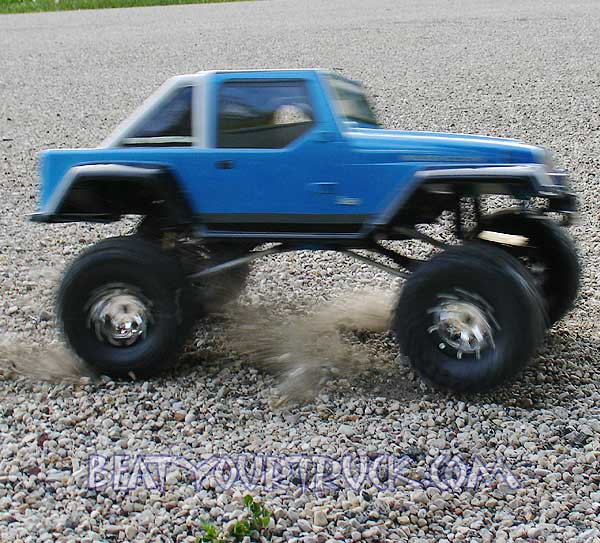
Our first runs with the truck were a blast! It exhibited a fair amount of body roll but it was nothing overly concerning. It was expected with the higher center of gravity and weight of the chassis. I really wanted to keep the fender flares on the truck (versus cutting them off) as I wanted it to be somewhat scale looking. This meant the truck would need to sit a little higher for tire clearance.

The picture below shows a standing start on loose gravel and how all four tires will light up without any problem. You can also see the torque of the motor and how it actually twists the truck! I really like this and it mimics a 1:1 truck in this fashion.
Beat Your Truck Axial AX10 build

Grass, gravel, blacktop, dirt, sticks, you name it.....this little truck can conquer it! The 7.2 volts applied to the TowerPro servo is awesome and it will turn the tires on any surface, hard or soft. It has plenty of turning power and for the cost of the TowerPro and the Castle BEC, it is a tough combination to beat.


   THE NEW MAYOR OF BOULDER CITY   

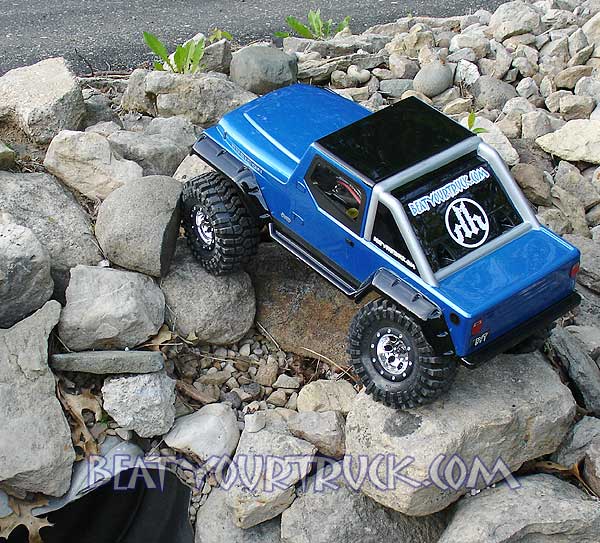
I never intended for this truck to be a competition crawler and in the end, it is not. However it is much more of a crawler than I thought it would be! The weighted tires and grip provided by the Losi Clawz and the ProLine FlatIrons is impressive to say the least. While it crawls better than I had planned, I could easily enhance this ability further with some shock limiters and perhaps some different springs. I set the drag brake to 40% and that seems to work really nice on the rocks; keeping the truck from rolling backwards when navigating hilly stuff.

So what tires work better, the Clawz or the Flat Irons? I am not for sure but I think the Clawz are better on the rocks, at least with this setup. Both seemed to do a great job on the variety of surfaces I was running on. Ultimately, I think I was most pleased with the more scale look of the ProLine setup. The memory foam seemed to work every bit as well as the cut foams (at least to our novice crawler senses) and again, its climbing ability is quite impressive. Check out that rear tire tuck! SWEET!
Beat Your Truck Axial AX10 build


   OVERALL PERFORMANCE   

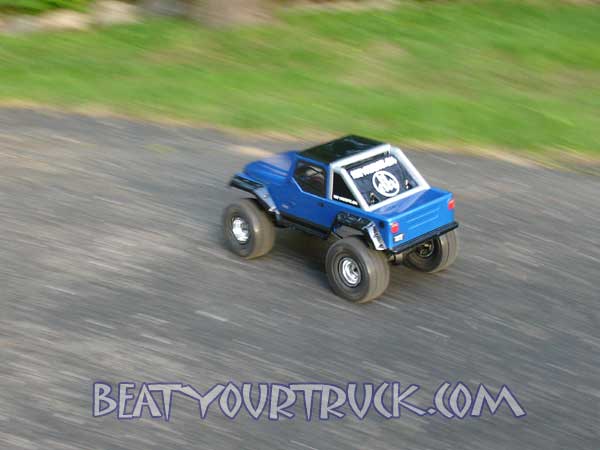
The drive power is smooth and there is lots of it. The overall top speed was a little too slow for our liking so we installed a 16T pinion (versus the stock 14T Axial) and now it is perfect (for our needs anyway). A perfect mix of speed and wheel spin for the trails and low speed tire turning for the rocks. Under flat out wide open throttle conditions, I could about 20 minutes of run time out of our Apogee pack and that is great. The motor got pretty warm during some of our runs but nothing overly hot. The battery and ESC were nice and cool, a good sign that it's not over-geared.

The sheer torque that the Holmes Hobbies 7t motor delivers is amazing. While it is not a speed demon, I am very pleased with the top speed running a 16T pinion and torque/power is more important with our build goals in mind. Even at half throttle, when you punch it, you can see the body twist and the truck just scoots! The power is on demand throughout the trigger range.

The Sidewinder ESC really lets you ease on the throttle for controlled climbing. We softened up the low end throttle curve just a little bit and it is a dream to drive. As mentioned above, it stayed cool/warm during all of our runs. The Castle BEC works awesome and it gave the steering servo ample juice to turn the wheels at will, no matter what the truck was parked on.

The only real problem experienced with the truck (after about 6 or 7 packs) was the drive shafts. They popped off several times, typically if I got the truck bound up or stayed on the trigger on jump landings. Some meatier shafts or the Axial drive shaft rings would help to fix this problem and I will be adding them to the truck in the near future. The other issue I see is one leaking shock. Nothing major but some aluminum shocks have been added to the list of future upgrades. We'll add those when we start playing with shock limiters and different spring configurations.


   CONCLUSION   

Fun. It is the one word I can come up with to describe this rig. In fact, it is one of the most pleasing to drive trucks I have ever owned. It is not the fastest truck, nor the best crawler, but it is a really nice mix between the two. I live out in the woods so the terrain is varied and there are a lot of different places to run, if you have the right rig to do it. The truck will blast across the grass, dirt, rocks and whatever else it runs into. This truck turned out to be everything I wanted and more.

rummyrc logoThe chassis work from RummyRC is nothing short of impressive and the design is rock solid. Fit up of all the Axial components was spot on! No funny business to get things to fit and that is impressive. The great thing is that we could have asked them for a full out competition crawler and that is what we would have received. It is so nice to deal with a company that will custom make exactly what you want, not what they think you want!


HH logoThe electronics suggested to us by Holmes Hobbies could not be a better fit for our mission. It is a simple setup yet there are a lot of options for customizing how it behaves by using the CastleLink system. It is awesome to find a custom crawler dedicated shop like Holmes Hobbies. Not only do they know what they sell, they use it!

Why not buy from the experts and use what they use? The level of expertise and service at HH is top notch.


apogee logopApogee lithium power prevails once again and we are reminded why it is our preferred power source.


ffrc LOGOThe carbon fiber battery plate we made from our FullForce RC carbon fiber sheet was a nice touch and again, I am constantly amazed at the places I find to use this stuff! I am planning on adding some carbon fiber splash panels in between the chassis tubes to protect my electronics when puddle blasting. More pics of this to come...it should look very trick and work great!


hobby fever logoThe wheels and tires we picked up from Hobby Fever are awesome and not only perform well, but put a very nice finishing touch on our truck, especially the ProLine goods. They really gave the truck a more scale look.


axial logoThe Axial AX10 crawler kit offers a million options above and beyond what we did. Or simply put it together like Axial intended and you will have yourself one awesome crawler. Note that Axial offers a TON of hopups and other crawlers options (kits & RTR). Be sure to check them out!


This project was a complete blast to build and we hope you agree that the finished product turned out very well.

Are you inspired to build something like this? Cool! Two suggestions:
#1 - utilize the companies we did to obtain the basics you will need for your build.
#2 - and most importantly, build it your way!

Now, go Beat Your Truck!


   STAGE 2 IS COMPLETE!   

axial logoStage 2 of our Trail Buster is complete! We hit it hard with a TON of Axial Racing hopups, some are a little on the cosmetic side but most are to beef up our drivetrain, suspension and performance.....here's the short list:


Cosmetic Upgrades (yeah....we like our rig to look good!)
- Axial Blue Color Pack (blue bent links, blue spacers, etc) - AXA1409
- Axial 2.2 Beadlocks - AX8110 & AX8115 (Blue)

Performance Upgrades (yeah....really we like our rig to work good!)

- Axial Aluminum Shock Bodies - AX30122
- Axial Slipper Clutch Set - AX30414
- Axial 12mm Aluminum Hubs - AX30429
- Axial Driveshaft Rings - AX30493
- Axial Straight Axles - AX30421
- Axial Aluminum Rear Axle Lockouts - AX30494

CHECK OUT STAGE 2!


© Copyright 2001-2006  Beat Your Truck.   Site best viewed at 800x600 or higher with Internet Explorer 5.5 or higher.
Advertise with Beat Your Truck     *     Donate to Beat Your Truck