| |
|
| |
|
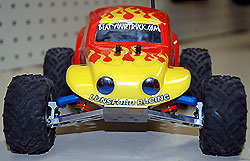
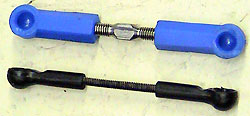
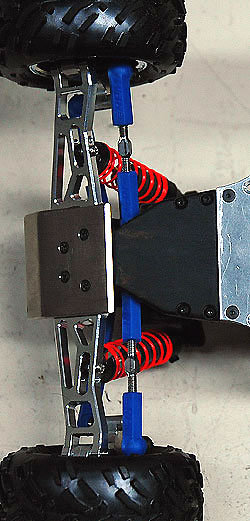
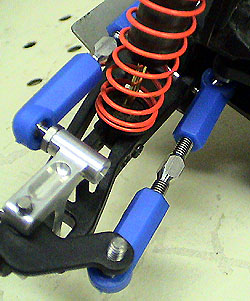
Start by removing the stock turnbuckle assemblies and keep them handy. You will use them to get the correct lengths on your new 1/10 scale setups. You can pull all the turnbuckles off at once or do a set at a time so you don't get confused on what length of turnbuckle goes where. Either way, we used the 1-1/8" turnbuckles on the very front of the Mini-T and the rears. The 1-1/4" long turnbuckles are for the steering linkage/toe-in adjustment. You COULD use 1-1/8" turnbuckles here also but the 1-1/4" gives you a little more adjustment along with more thread in the rod ends for strength. Thread the RPM rod ends onto a turnbuckle and get them to the same length as the stock one. Repeat this for all the turnbuckles. Be sure to orient the rod ends the same way also (example - one rod end may be at an angle compared to the rod end on the other side of the turnbuckle...they don't always face the same way). Know that you will probably have to do a little fine tuning once they are installed but getting them to the approximate same length will save some time later. Once you get the turnbuckles all setup, remove the stock ball studs from the truck. If you read our review of the Lunsford Mini-T titanium ball studs, you already know that the rear stud by the motor plate is a pain to get at. You will have to remove the motor plate screws and either slide it outward or remove it completely to gain access to that stud. Not a big deal, it just takes longer than the others. After all the studs are removed, it is time to tap the holes out for the slightly larger threads on the 1/10 scale studs. If you are threading new holes into the plastic, you will not need to drill them out first. Just take it slow and be sure to keep the tap straight as you cut the new threads. If you have upgraded to aluminum, it is recommend to drill the holes out first (with the bit recommended on the tap package). While this is not entirely necessary, it makes threading the aluminum much easier. If you choose not to drill the aluminum out first, know that you have a greater chance of breaking the tap or messing up the new threads. Once the new threads are in place, install the new ball studs. Go very snug in plastic and use blue thread locker if you are putting them into aluminum. Next, pop on your new turnbuckle assemblies and check for fit and any interference. We found interference in the following spots: Inner steering rod ends - lightly shaved the rod ends and chassis to eliminate the rubbing. Inner rear rod ends - shaved the rod ends to keep them away from the out drives. Inner rear rod end (motor side) - shaved the rod end and the gear cover to keep the rod end from contacting the gear cover and limiting suspension movement. We had been using the Lunsford clear gear cover but reinstalled the stock gear cover. The stock cover is thicker and we were able to remove sufficient material from it to gain clearance. You will need to remove a significant amount of material from the inside rod end and the cover to get things moving smoothly. This is the ugliest part of the upgrade...luckily, due to its location, you really can't see it. Be prepared to fire up the hobby knife! Inner front rod ends - lightly shaved the rod ends to keep them from hitting the chassis. All of these "shavings" were done with a hobby knife and not much needs to be taken off. In fact it is best to remove as little as possible as not to reduce rod end strength. Know that you may have to make additional mods depending on other aftermarket parts you have or other unforeseen factors. Make any final rod adjustments (the RPM camber and toe-in gauges come in very handy here) and that's it! After many high speed runs and even more high speed tumbles, the new 1/10 scale turnbuckles have held up beautifully. In fact, maybe too well. As you might expect, when you add strength to one part, something else might give. We found this to be true with our rear hubs. We snapped one off at the rod end mounting point. No problem as we were planning on adding aluminum rear hubs anyway. We also cracked a rear inner mounting point (rear shock tower). Basically, the turnbuckles are so tough, they will transfer the energy to another part. The rear shock tower was no big deal for us as we already had an aluminum rear tower on order. What will break next? Who knows?! It is almost guaranteed that it won't be the turnbuckles! Was the upgrade worth the trouble and money? Yes. They looks awesome and perform just as well. You could save a few bucks by going with standard grade ball studs however.....we believe anything worth doing is worth doing right. That's why we chose the Lunsford titanium studs! It should also be noted that our test truck was heavily equipped with Dynamite aluminum arms, FFRC aluminum pivot blocks, FFRC titanium hinge pin retainers, FFRC aluminum front hubs (and now Dynamite aluminum rear hubs), Lunsford titanium hinge pins and a 60+MPH brushless MAMBA motor system. This upgrade MAY be best for aluminized trucks? We'll leave that decision up to you. At the very least, aluminum hubs and an aluminum rear shock tower are probably good ideas. Then again, with a 15-20MPH Mini-T, they may not be needed! This custom upgrade was fun to do and adds a very cool level of "bling" to our project. We love it!
Ok! Onto the final stage! Let's do the MAMBA! |
||||||||||||||||||||||||||||||||||||||||||||
Advertise with Beat Your Truck * Donate to Beat Your Truck