|
We approached our Mini-T lithium battery charger with the budget minded buyer in mind while retaining quality. When you think about many of the Mini-T owners out there, lithium power is very desirable but not very affordable. There are several Li chargers that can run $300+!!! With the average basher/racer in mind, our goal was to keep this stage of the project in the $100 range.
We scoured the internet and local hobby shops for a charger solution. We were able to find a couple in the $130-$200 range however they required a power supply. The cost of the power supply would have put them over $300. This was more than we wanted to invest.
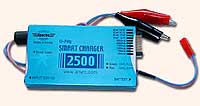
 PFM Distributing to the rescue. They offer a dedicated Li charger for a mere $59.95! PFM also has an excellent assortment of LiPo batteries from APOGEE at excellent prices. The charger can handle a wide variety of Li batteries and is super compact in size. That’s an extra bonus. It has various indicator lights and is quite easy to use. PFM has given RC fanatics a tool to make lithium power affordable. PFM Distributing to the rescue. They offer a dedicated Li charger for a mere $59.95! PFM also has an excellent assortment of LiPo batteries from APOGEE at excellent prices. The charger can handle a wide variety of Li batteries and is super compact in size. That’s an extra bonus. It has various indicator lights and is quite easy to use. PFM has given RC fanatics a tool to make lithium power affordable.
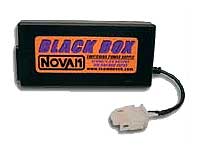
Ok, now to find a reasonably priced power supply. After locating many $100+ priced units, we located a Novak Black Box 4.5 amp power supply at our LHS for $45. It is nothing fancy (it looks like a laptop charger- see picture to the left) and is a little light on amps for competition charging but should work perfectly for our dedicated Li charger. The output plug on the charger is not what we needed but that is easy enough to fix with a new connector. While we were at the LHS, we picked up a couple of connectors to solder onto our new Li batteries and our FM receiver (a deal at only $2 each).
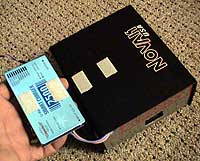
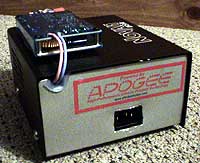
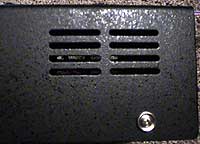 Looking at our charger and power supply sitting on the bench left something to be desired. Lots of loose cables and the perfect opportunity to snag, pull or drag something off a workbench. That’s not good. In the car we go to the local Radio Shack (chances are there is at least one store within 15 minutes from you). There we found a vented, metal project box that had almost perfect dimensions to house our power supply and charger. It also came with little rubber feet to keep it from sliding around on the workbench. Best of all, it was $6! We also picked up a connector for use between the charger and power supply ($3). Looking at our charger and power supply sitting on the bench left something to be desired. Lots of loose cables and the perfect opportunity to snag, pull or drag something off a workbench. That’s not good. In the car we go to the local Radio Shack (chances are there is at least one store within 15 minutes from you). There we found a vented, metal project box that had almost perfect dimensions to house our power supply and charger. It also came with little rubber feet to keep it from sliding around on the workbench. Best of all, it was $6! We also picked up a connector for use between the charger and power supply ($3).
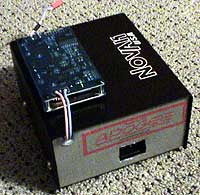
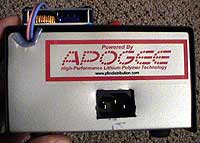 Once we got back to the shop, we soldered on our new connectors to the power supply and charger. Next we lined up the power supply in the box and penciled out a spot to make a cutout for our wall plug. A quick chop or two with the Dremel and everything was ready to go. We used some double-sided tape to secure the power supply in the box. We then made a small notch for the power feed to run up to the charger. The cover was bolted on and we secured the charger to the top of the box with some Velcro tape. The charger relies on you to manually select the battery type (2 cell, 3 cell, 800mah, 1100mah, etc) that needs to be charged. The legend to the jumpers is on one side of the charger and the indicator lights are on the other side. The Velcro will allow us to pull the charger off and reference both sides of it. It also allows us to remove it and store it inside the metal box for storage and travel. Once we got back to the shop, we soldered on our new connectors to the power supply and charger. Next we lined up the power supply in the box and penciled out a spot to make a cutout for our wall plug. A quick chop or two with the Dremel and everything was ready to go. We used some double-sided tape to secure the power supply in the box. We then made a small notch for the power feed to run up to the charger. The cover was bolted on and we secured the charger to the top of the box with some Velcro tape. The charger relies on you to manually select the battery type (2 cell, 3 cell, 800mah, 1100mah, etc) that needs to be charged. The legend to the jumpers is on one side of the charger and the indicator lights are on the other side. The Velcro will allow us to pull the charger off and reference both sides of it. It also allows us to remove it and store it inside the metal box for storage and travel.
In total we spent about $118 and are very pleased with the results.
After we stuck a couple of decals on it, it looks “factory”!
Oh yeah…we plugged everything in and it even charges batteries!
REVIEW OF THE PFM LITHIUM BATTERY CHARGER
The charger works excellent. It features indicator lights and will let
you know if something is hooked up wrong, when it is almost done charging
and also when the charge is complete. THere are simple jumpers to move
to set the appropriate charge for the battery you will be charging.
Move one jumper to set the number of cells and the other for the power
of the battery. Plug it in and let it go. It is that simple. The legend
to the jumpers is on one side of the charger and the indicator lights
are on the other side. This is a little bit of a hassle but well worth
the trouble for the cost of the charger. The mah settings do not match
up with our batteries exactly (830mah batteries and a 700mah or 1000mah
setting) so we checked with PFM. They recommended always going with
the lower mah rating. We were a little worried about reduced run times
because of this but it is not the case. The run times on our 830mah
LiPo's exceed the run times of 1100mah NiMH's!! Yes...you read that
correctly! Not only that, Lipo's have a lot more power! Unbelievable
and simply impressive.
We could not be more pleased with this incredibly small and inexpensive
Li charger. Sure we would like it to come in a nicer case, have programmable
features etc but we are on a budget and this is a budget minded charger.
It is everything it is supposed to be and more. It is the perfect solution
for dedicated lithium battery charging without breaking the bank.
| LITHIUM CHARGER - PROJECT COST EVALUATION |
| DESCRIPTION |
COST |
| PFM Lithium charger |
$59.95 |
| Novak 4.5 amp power supply |
$45.00 |
| Radio Shack Metal Project Box |
$6.00 |
| Miscellaneous connectors |
$7.00 |
| TOTAL |
$117.95 |
Visit the PFM
Distributing web site to get your hands on the great lithium charger
we used in our project.
|