| |
 I
have been running BYT for close to 10 years now, and we have done a lot
of good things to help people and help grow the RC hobby. This little
project might be the coolest and the best thing we have ever done. When
I say "we", I mean Kevin Van (owner of
Socal Crew Store)
and NickRummy (owner of RummyRC).
Both are long time members here and spend a lot of their free time helping
me run the site and keep order. Onto what they did..... I
have been running BYT for close to 10 years now, and we have done a lot
of good things to help people and help grow the RC hobby. This little
project might be the coolest and the best thing we have ever done. When
I say "we", I mean Kevin Van (owner of
Socal Crew Store)
and NickRummy (owner of RummyRC).
Both are long time members here and spend a lot of their free time helping
me run the site and keep order. Onto what they did.....
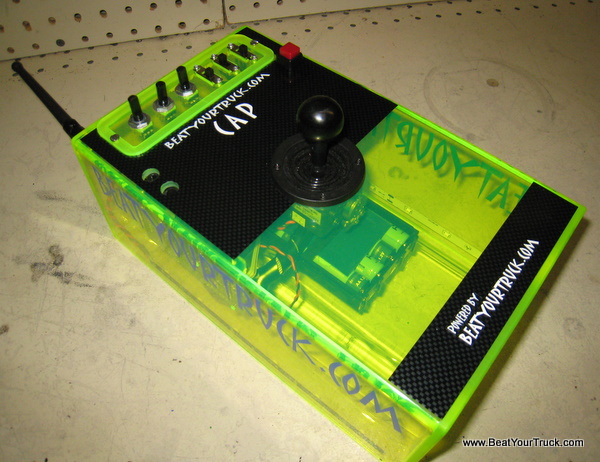
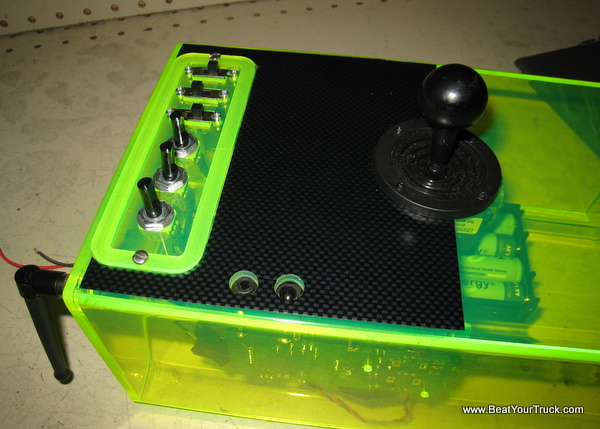
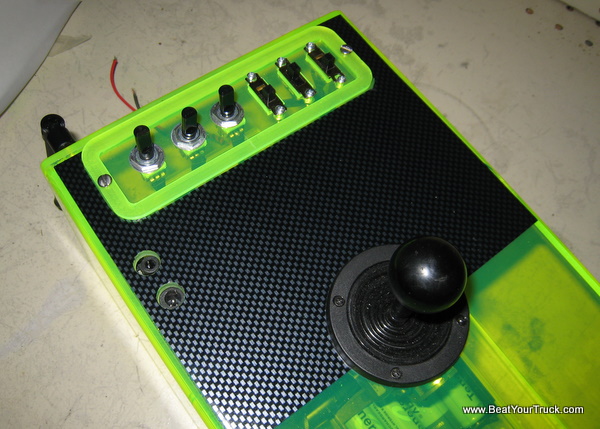
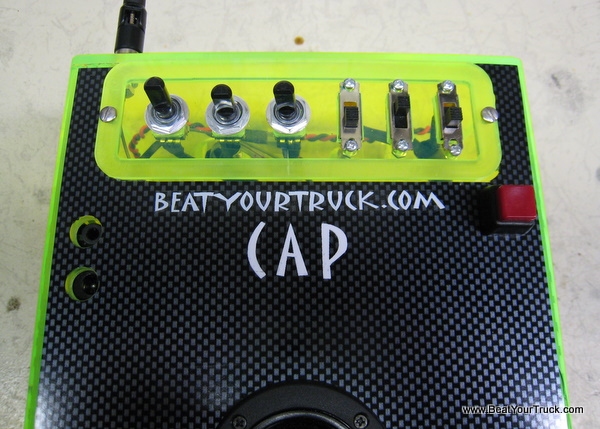
"CAP" is also a long time member here and despite having MD (muscular dystrophy) is one of the most positive and helpful members on the BYT forum. Muscular dystrophy is a group of disorders that involve muscle weakness and loss of muscle tissue that get worse over time. Recently, CAP has lost use of a hand, which can make it hard to drive an RC truck, one of his favorite things to do. He posted on the BYT Forum about the dilemma and a few of us stated brainstorming, then ordering parts, soldering, making custom stuff and finally, came up with what we think is the ultimate one-handed RC ground transmitter. Nobody offers one to purchase (not like this anyway), nor could we even find decent info on anything like it online. We're sure we are not the first to do it, but we'll do our best to post up info on how we did it and how anyone with a similar challenge could do the same thing. This HAS taken a long time to complete but it has traveled around the
country a few times and has some pretty neat features. Yes, this is
a transmitter for CAP which will enable him to operate his truck one
handed (thank you Mr. Joystick). The case is custom and is made to rest
on his leg (bottom of case is indented). |
| |
| Here's a quick overview (in case you have the attention span of a gnat and can't make it through the whole project):
We wanted to post the details of the build with part numbers etc in case someone else in CAP's situation is thinking about accomplishing the same task. Strangely enough, we could not find good info on how to build something like this on the web.....so now it will be here for anyone and everyone to learn from! Here's the BYT forum discussion thread on it.
|
| |
| Kevin Van, NickRummy and Chris spent
some time chatting about the project, how best to accomplish it, what
materials and components to use, etc. It seemed fairly straight-forward
and off we went, ordering electronic components and bits of this and
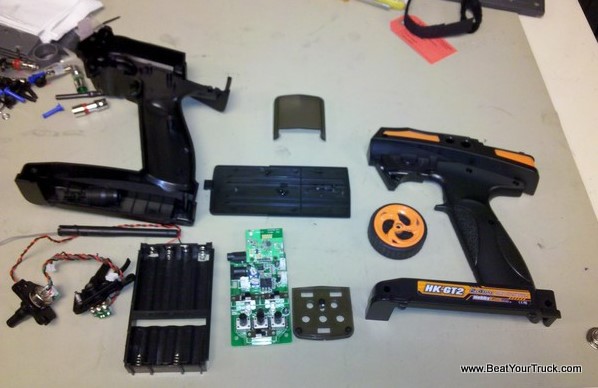
that. We ordered a 2.4 ghz HK-GT2 radio system from HobbyKing. The price was right at about $30 shipped and it will make sure CAP doesn't have to worry about someone in the neighborhood running the same frequency. 
|
| |
Kevin Van: Completely disassembled it, did a little reverse engineering to figure it all out.
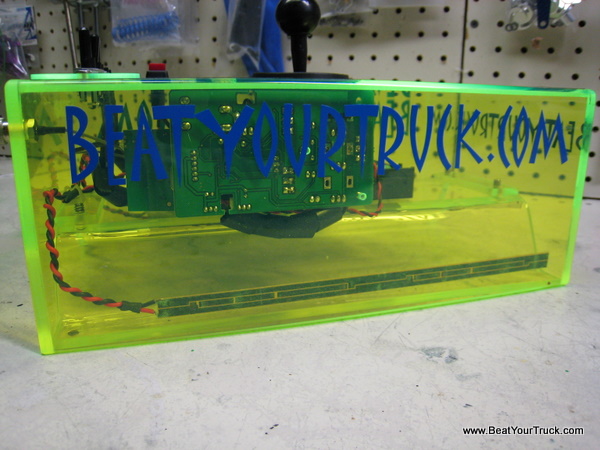
Hope you kept the receipt, because it doesn't matter any more! Initially measuring in circuit, as I was being lazy, found odd ball values for the throttle and steering pots. I was annoyed that I'd have to do math to calc voltage dividers so I could use normal value pots....until I looked closer...DOH! They have dividers on board....they are using normal values, glad I thought of it....all the pots in the TX are 5k, including the trims. Decided I didn't like how inefficient the voltage regulator on it was (about 40% using a linear regulator) so ripped it out and put a switching regulator in it's place at about 97% efficiency. I used a Recom 785.0-0.5, which is a drop in switching regulator for the stock 7805 that was in the unit. It's pin compatible, about the same size, and can supply 1/2 amp. About $6.32. Should pretty much double battery life right there. Dropping in a switcher like this is not necessarily free. You should have caps for impedance matching to the battery pack, and switching noise can trip up some circuits....luckily the on board circuit for the radio already had the caps it needed so nothing was added to address those potential issues. It is a little fatter than stock, so I just backed it with double-sided tape to the board and used thermal standoff pins (like you'd use in power resistors, like bias resistors in a CRT) to come up to the Recom part. It's leads are such that it was intended to stand up right, not lay on it's back. Of course, you could make little wire jumpers to do the same thing. Turns out how the board was finally mounted, I could have stood the regulator up with no ill effect. I didn't want to raise the profile of the board because none of the mounting was hammered out yet. The offending regulator and it's replacement:.jpg) Unused stand up mounting position 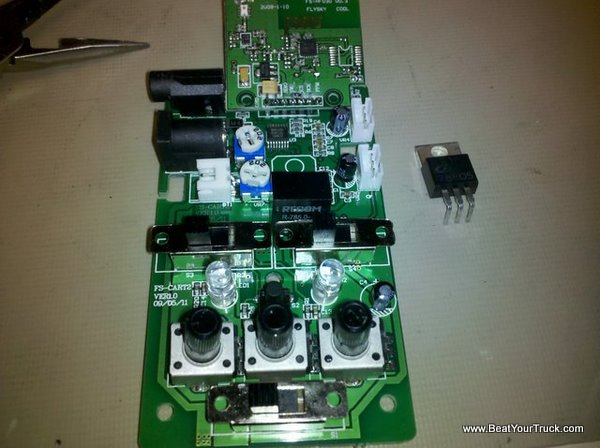 Final install. Heat shrink added because the clearance between the pins was close. 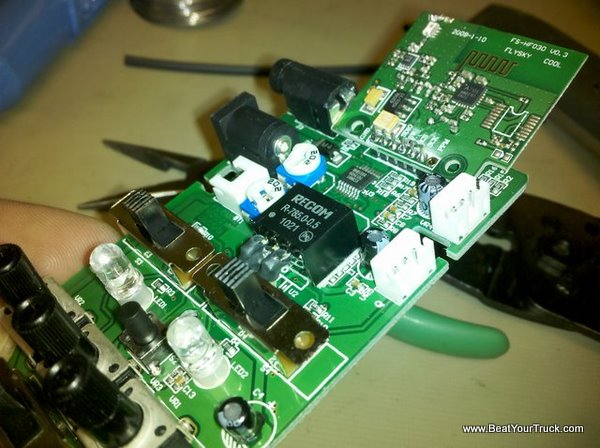 I used ribbon cable and moved all the switches off board (power, servo polarity, etc.). Ribbon cable is much cleaner than loose wire, plus I have a hundred feet of it from some FPGA programming pods I made, completely unrelated project. Added heatshrink, etc. Replaced the trim pots with the same rating but panel mountable pots, again, ribbon cable out to them. 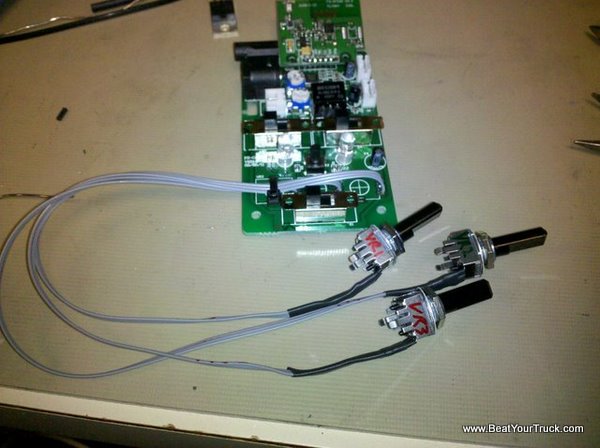 I used Panasonic EVU-F3MFL3B53 at a $1.62 each. Because they are basically identical to the stockers except have a panel mount nut and thread. This model also has a center detent so you can feel when it's centered. It took a lot of time to locate just the right part then reading the spec sheets for the candidates to decode the part numbers to see exactly what you are getting (for instance, it's also available sans detent, etc.) I did not buy new switches, the stock ones were merely located off board since they had mounting holes in them already. I harvested a pigtail from scrap equipment (I have a very rich assortment of this kind of thing) and matching antenna to remote mount it. Now, we'll call it an ADA accommodation. Fact is, the stock antenna only mated with the molded case of the original controller and couldn't be reused. Technically you shouldn't change the antenna on a type accepted thing like this because it's rated and accepted by the FCC as a system. I'm sensitive to this, however in this case, there wasn't a viable alternative to reuse the original. However, know that the stock antenna and the replacement antenna have identical internals (the shield is stripped away and the center conductor acts as an antenna for about 3.5" ) so there is no functional difference between them other than the ability to chassis mount it because the connector is threaded. The surface mount RF land is tiny and calls for careful soldering. There is a nearby SMT filter, that could easily be destroyed, which would be nearly impossible to ID and replace by mortals. It's too tiny and has no markings. I also tacked on a wire to a nearby GND pad and heat shrunk it to the coax pigtail to provide more support of this delicate connection. 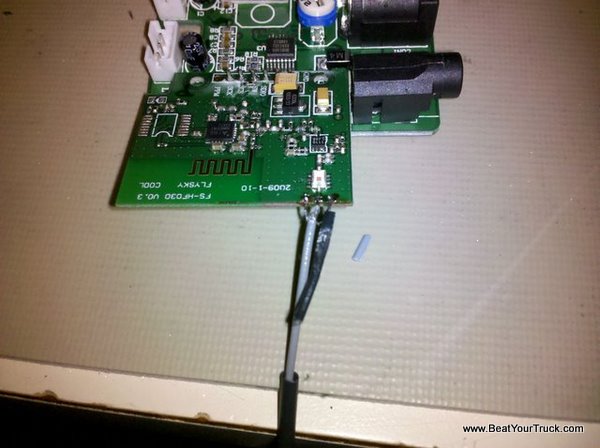 Before the HS was pulled over the extra support wire. Located and purchased a suitable joystick with appropriate pots. Wire so forward is gas, rear is brakes. Left and right are obvious, unless you have the servo polarities wrong, flip the switch. I used a 4site electronics 4SJ200-1B-M2-S joystick for about $28. They exist on ebay as well. I simply lopped off the existing pot to pcb connectors and tacked them onto ribbon cable, and the other end to the joystick. Taking care to get all the wires in the correct positions. 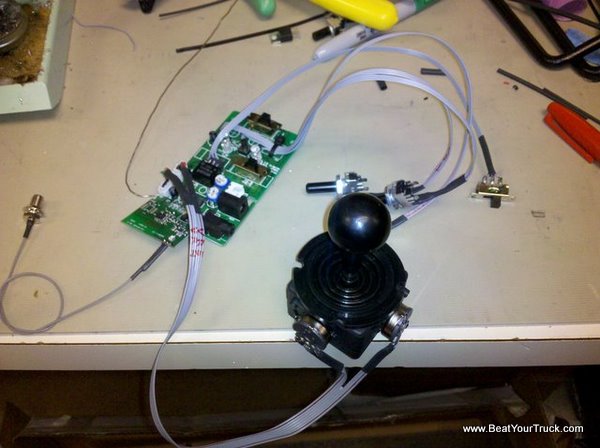 A bunch of 2600maH NIMH AA's for the battery pack. Luckily the stock controller has a separate battery tray that could be reused. The batteries were from all-battery.com. Also harvested a external power supply, maybe 12v at an amp or so....added linear regulators for the appropriate voltages at about 61.5ma trickle charge. You can essentially leave it plugged in all the time and it should not ever get warm or cook the batteries. Bad news is a COMPLETELY flat pack could take 2 days to fully charge, lol. For reference, a 9v battery can supply 180ma, so it's super safe. Shipped the whole thing off to Nick who did the box and mounting. Later
he sent it to Chris, who I helped via email to pick out some LEDs and
how to tap power for them. He also did interior decorating and decals,
etc. |
| |
| NickRummy:
I drew the joystick in CAD when I got it from Kevin and then I did basic overall sizes of the components to go inside. I asked CAP for dimensions of his leg in case he wanted to use it that way. Then I designed the box around all those dimensions. I made sure the components would fit inside and made a recess in the bottom that would fit over his leg nicely. I wanted to keep the bottom flat though so that if he wanted to just set it on a table or something he could do so, and of course it had to have a removable panel so that electronics could be messed with. The bottom made most sense since I wanted to keep the top nice and clean looking. 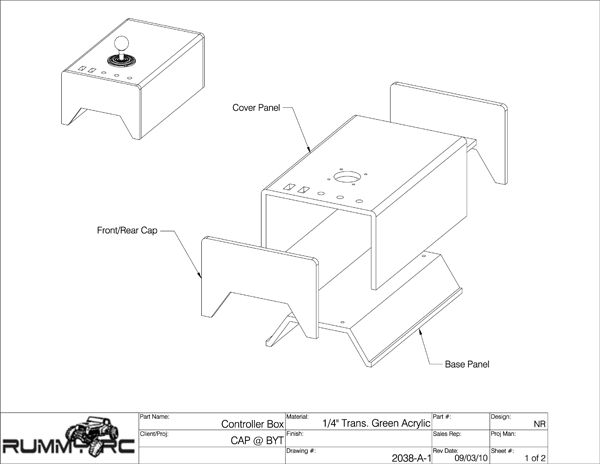 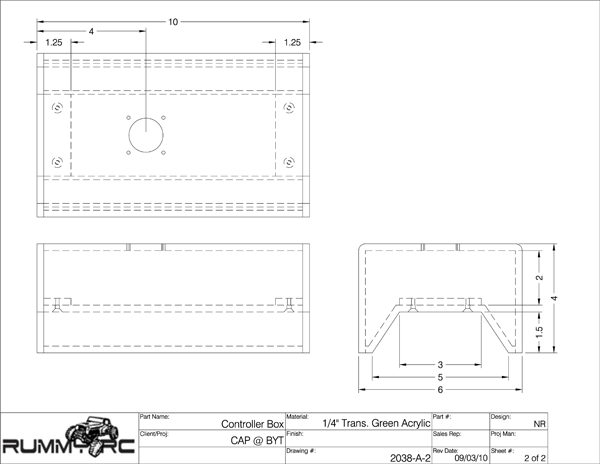
After the design was finished I decided to toss the idea of it being
made out of acrylic to Mitchell
Plastics & Casegoods. I use them through the company I work
for, for a lot of projects. Their work is outstanding. I made an appointment
with Mitch the owner of the company to go over the project. They took
my drawing concept and added a few elements to it based on their prototyping
(like the switch panel being removable and the holes for charging).
They're the ones who get the credit for the fantastic fabrication of
the case. At that point it was boxed up and sent off to Chris! |
| |
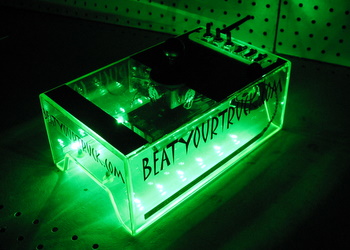
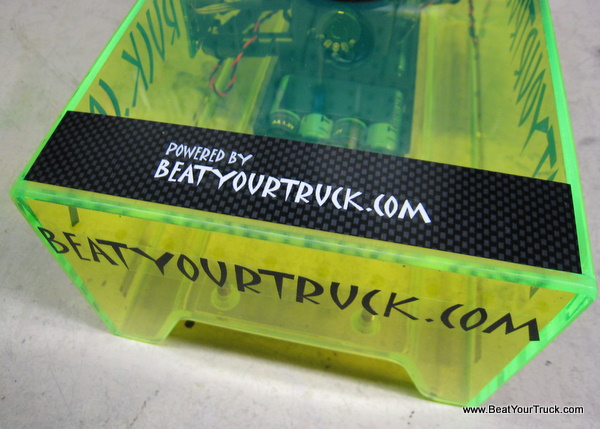
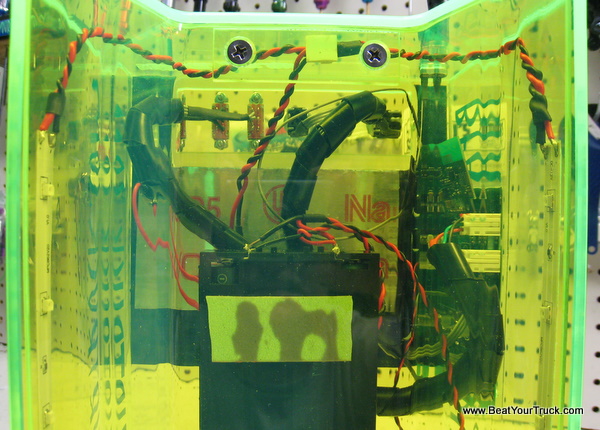
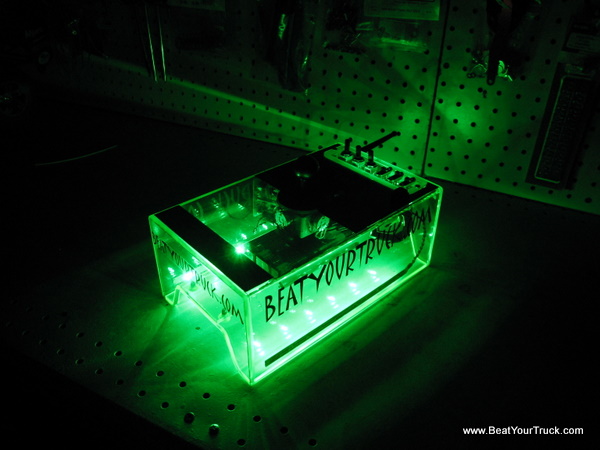
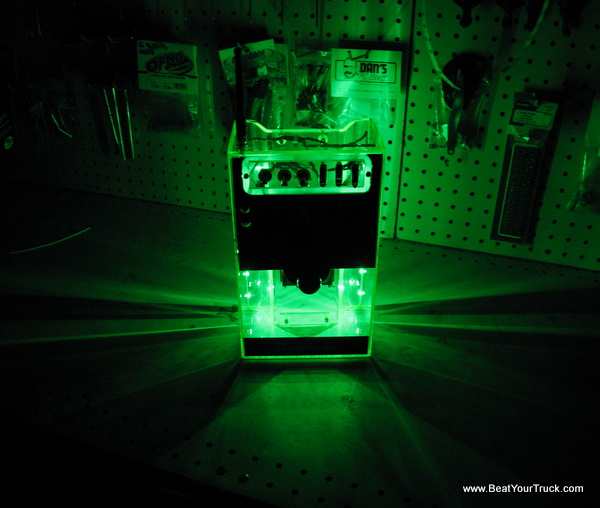
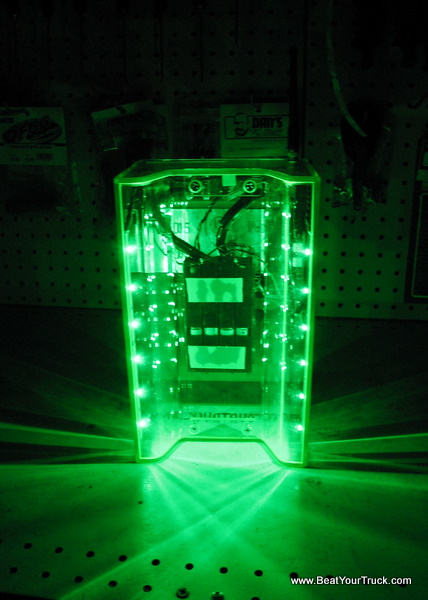
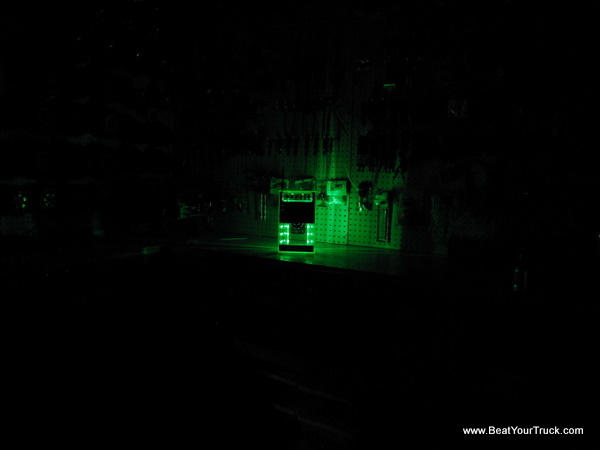
| Chris: As you have already figured out, all the hard work is done. My part was going to be some testing of the final product, installation of the LED light system, tidy up wires etc, and install some exterior graphics to pull it all together. I started by adding some wire wrap to get everything organized and clean for the impending LED install. Before: 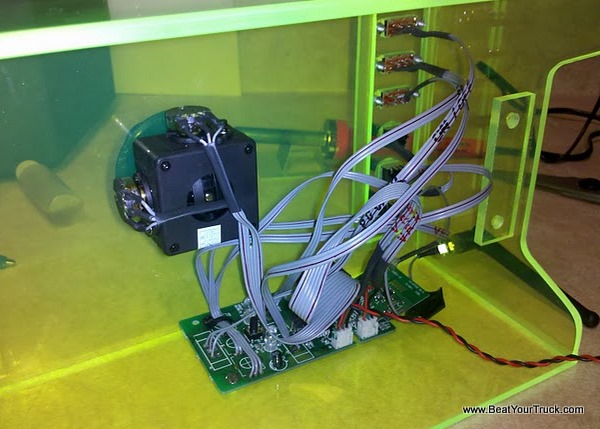 After: 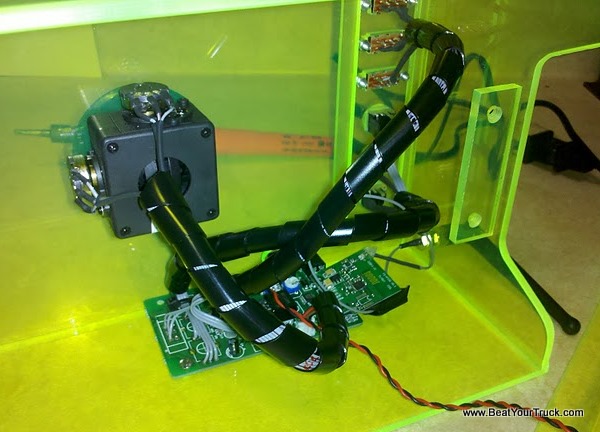 Ahhh...much better! I then hit Radio Shack for a push button switch to control the LED lights. I didn't want them on all the time as it would be a battery drain. The lights are rather an "oooh...ahhh" factor and no doubt are fun to play with. It's hard to walk by this thing without flipping the lights on and off! I had some nice red & black wire from another LED project I worked on and I used that to create the harness. A small wire clip keeps everything in place. 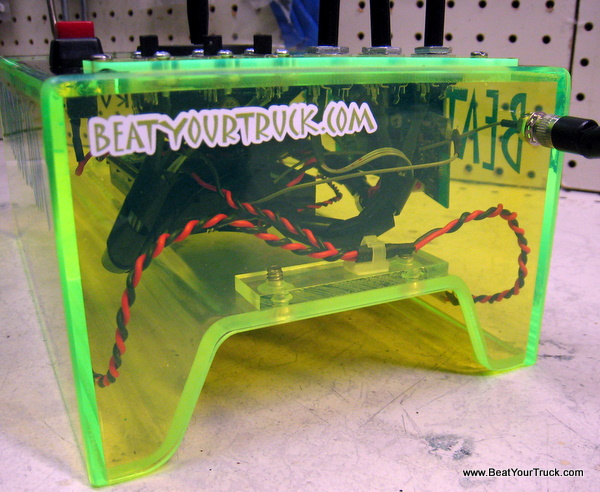 Kevin recommended Mouser Electronics to find some decent LED's and it was great advice. I found these killer LED strips that can be cut to length. I ordered a few feet of them and clipped off two strips with 6 LED's each. 12 LED's total for the box and they really light it up. They have 3M adhesive tape on them and are super easy to install. Just solder on your wires and you are set. 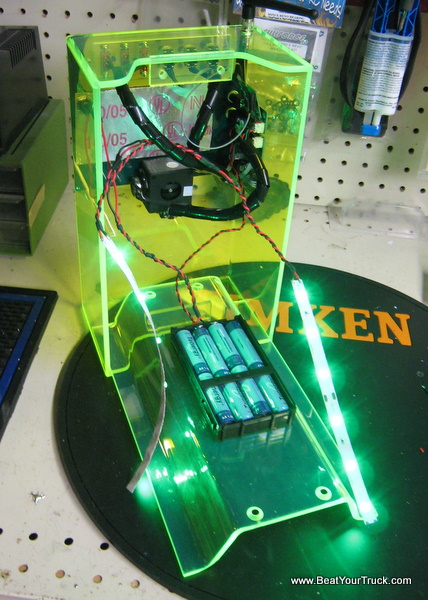
I drilled a hole on the top of the case for the push button LED switch and got power directly from the battery pack. As a final touch, I added some aluminum tape to the underside of the case top, under the carbon fiber decal to reflect the light around a little more. Simple, clean and very effective! 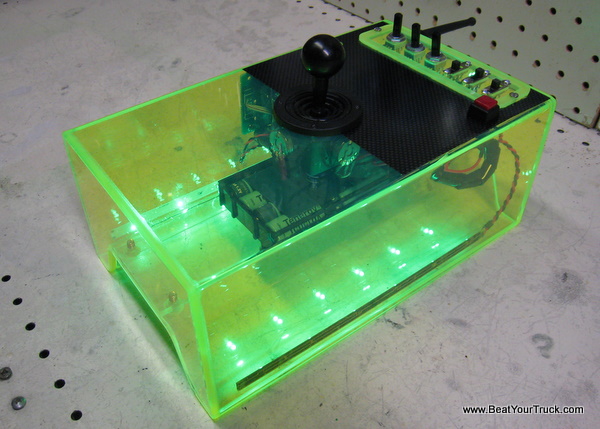 I did some bench testing with it, receiver pack, receiver and servos and everything moves smoothly and is quite responsive. Unfortunately due to a bunch of cold, wet and snowy weather, I never had a chance to actually drive a vehicle with it. After what I saw on the bench, I was confident it was going to work wonderfully for CAP. I also did some charging tests with it to verify the charger was working properly and everything was 100% functional. She is finally ready to head to her new master......Mr. CAP! |
| |
| We are extremely happy with how this project turned out
and we know the new owner will be also. We also hope this inspires and
helps educate others who might be facing the same challenges as our friend
CAP to not give up on a hobby that they love, rather learn a new way to
enjoy it! Here are a few pictures of it in the final stages! |
| |
| Special thanks to NickRummy (RummyRC)
and Kevin Van (Socal
Crew Store) for taking the time, resources and sharing their
skills to make this project happen. We all struggle to find free time
and they found a lot of it to help another person in need. My hat is off
to both of you and it is an honor to have you as a part of the BYT community. A BIG thanks to everyone at Mitchell Plastics and Casegoods, Inc. for their incredible work on the case. They delivered a ultra-professional piece that is nothing short of brilliant! We would also like to thank all the members of our forum who shared their thoughts and ideas on the project. And of course we can not forget our BYT Supporters and BYT Advertisers who help BYT keep the lights on. Without them, we would not have been here to help!
|


Advertise with Beat Your Truck * Donate to Beat Your Truck